

- Select that instance you will find, list of tabs below, choose security tab. After that click on security group.
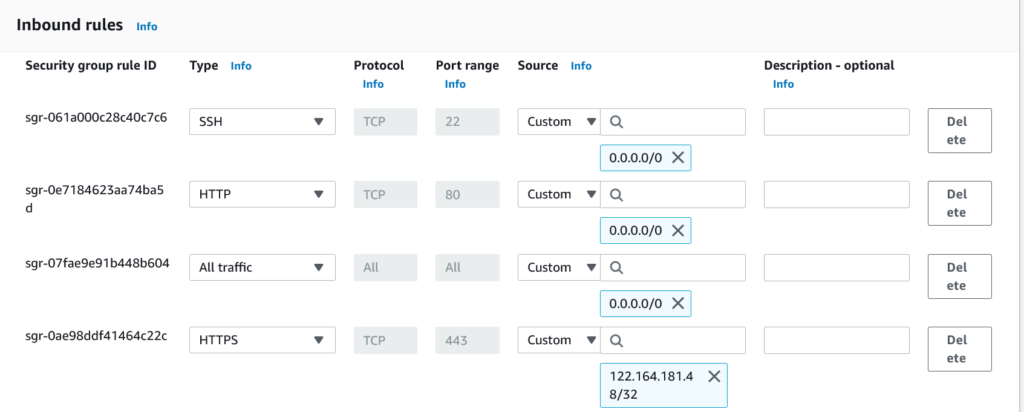
- Right side it shows “Edit inbound rules” click on it. Add below rules.
- SSH (Type)-TCP (protocol)-22 (Port range)-source (Ipv4)
- HTTP (Type)-TCP (protocol)-80 (Port range)-source (Ipv4)
- All traffic (All)-TCP (protocol)-All (Port range)-source (Ipv4)
- All traffic (All)-TCP (protocol)-All (Port range)-source (Ipv6)
Connect to the Gitbash using ssh command
- Select the instance on the top list click on “connect”.
- Then you can see list of tabs from them choose “SSH Client”.
- Then it shows the command for connecting “Gitbash”.
Example:
- ssh -i “thecorpwork.pem” ubuntu@ec2-65-0-26-45.ap-south-1.compute.amazonaws.com
- Copy the above command past in gitbash to connect.
- Before pasting that command you need to be in your “.pem” file path.
- Then only the above ssh command will work other wise it will not connect.

Apache installation and folder structure creation
- In Gitbash command line follow the below steps
- sudo su
- above command for root user permission
- sudo chmod -R 777 /var
- folder permission to create anything in var folder
- we need to create a folder structure www->html
- cd /var/www/html
- sudo apt update
- sudo apt install apache2
- sudo ufw app list
- sudo ufw allow ‘Apache’
- sudo ufw status
- sudo systemctl status apache2
How to move files from local to ec2 instace
To move files to Ec2 instance html folder we need to connect to the winscp
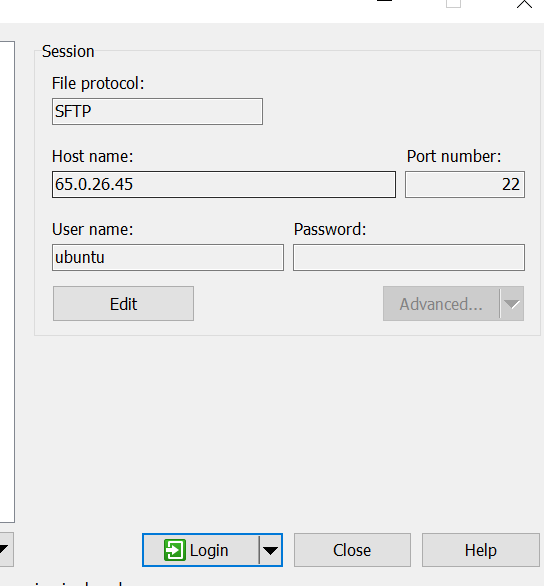
- From above click on “Edit” button, Then click on “Advanced ” button.
- After clicking the Advanced button new pop window will be opened.
SSH:
- KEY EXCHANGE
- AUTHENTICATION
- BUGS
- We need to click on “Authentication”
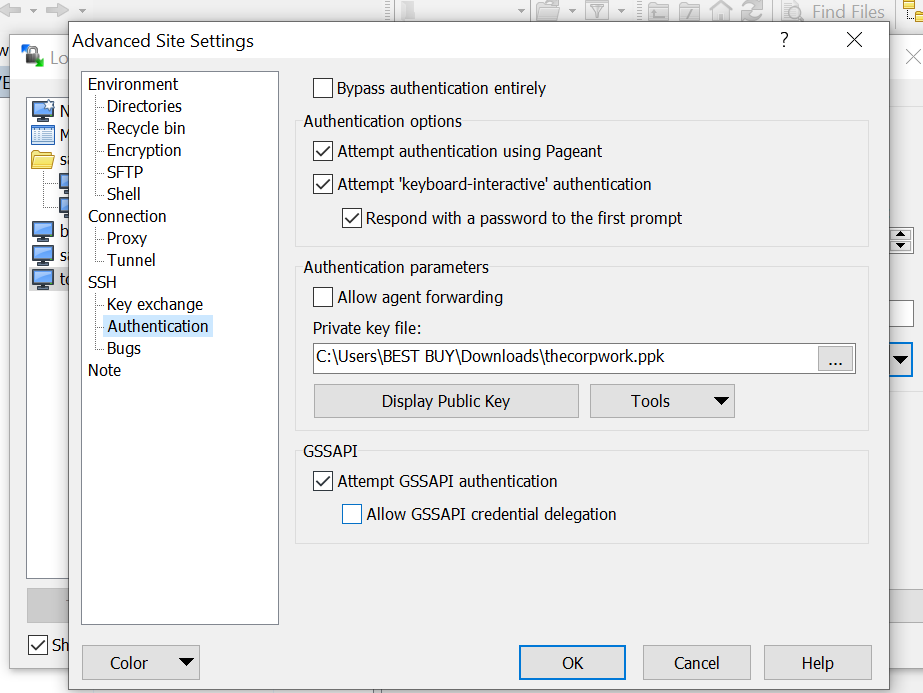
- No need to worry about the .ppk file, here your password is .pem file only which, we have
- Downloaded while creation of our EC2 instance, the winscp will convert automatically to .ppk file to login.
- After successfully connecting to the “winscp” you need to just drag your local files to the
/var/www/html folder path.
- You need to delete “index.html” file , after installing the Apache it will be created in the
/var/www/html folder . We need to delete that file or else rename it.
- Now we need to check our local files are working or not in the “EC2” .
- To Know that we need to click on “EC2” . instance
- Below we can see list of tabs from them click on “Details”
- Public IPv4 address: 65.0.26.45
- Copy that and past in browser now site will not be opened why because, default it will take
- https: which we are not configured yet.
- So, manually we need to make the Ip as http://65.0.26.45
- Then site will show your project out put.
Database creation using RDS
- Now we need database for our project.
- Go the “Ec2” instance dashboard in search bar search for “RDS”
- After clicking the “RDS” right side one button will be their named “create database”
- Click on it,
- Standard create (choose this one)
- Easy create
- Engine options (Choose below one)
- Mysql
- After clicking the “RDS” right side one button will be their named “create database”
- Settings:
DB cluster identifierInfo
- database-1
- Credentials Settings
- Credentials Settings :
- Master username
- Master password
Give user name and password based on your choice or else use default password.
- Public access :
- Yes (We need to choose this one)
- no
Now create your database no need to change anything except above changes.
SSL certificate Generation in AWS
STEP 1: Go to the AWS dashboard, in search bar search for “Certificate Manager”
We are going to see 3 options.
- Request a certificate
- Import a certificate
- Create a Private CA
Choose “Request a certificate” option from above
- Certificate type
- Request a public certificate
- Request a private certificate
Choose “Request a public certificate” option from above
- Domain names
Fully qualified domain name
c) Select validation method
- DNS validation – recommended
- Email validation
Choose email validation if you the domain registered email address for verification.
If you don’t have the Email details proceed with DNS Validation.
D) Tags
Tag key
- thecorpwork
After choosing your choice click on “Request” Button.
Note : If we choose “Import a certificate” option, then we need to follow below links.
- https://help.zerossl.com/hc/en-us/articles/360060120373-Installing-SSL-Certificate-on-Ubuntu
- https://blog.tcmhack.in/how-to-install-ssl-certificates-on-amazon-ec2-ubuntu-server/
STEP 2: Route 53
- After clicking the “Request” you will get 3 CNAME records, you need to add them
- In your hosted zone.
- To add them in you hosted zone you need to click “create records in Route 53”
- Then all your CNAME Records will be added to the zone automatically.
- It will to 5 minutes to validate the records.
- If all records are validated means you can see the status as success.
STEP 3: Load Balancer
Click on “Create load Balancer” button:
Load balancer types
- Application Load balancer
- Network Load balancer
- Gateway Load balancer
Choose “Application Load Balancer”
- Scheme
- Internet-facing
- IP address type
- IPv4
- Network mapping
- ap-south-1
- ap-south-1b
- Security groups
- Default and launch-wizard-1 (two groups selected)
- Listeners and routing
EC2->Target groups
Add below two groups
- Listener HTTP:80
- Listener HTTPs:443
- Secure listener settings
Security policy (Below one selected)
- ELBSecurityPolicy-2012-08
- Default SSL/TLS certificate
- from ACM->thecorpwork.com(2c4…) (selected)
- Choose a target type
- Instances
- Target group name
- protocol->HTTPS->443
- Health checks
- HTTPS (Selected)
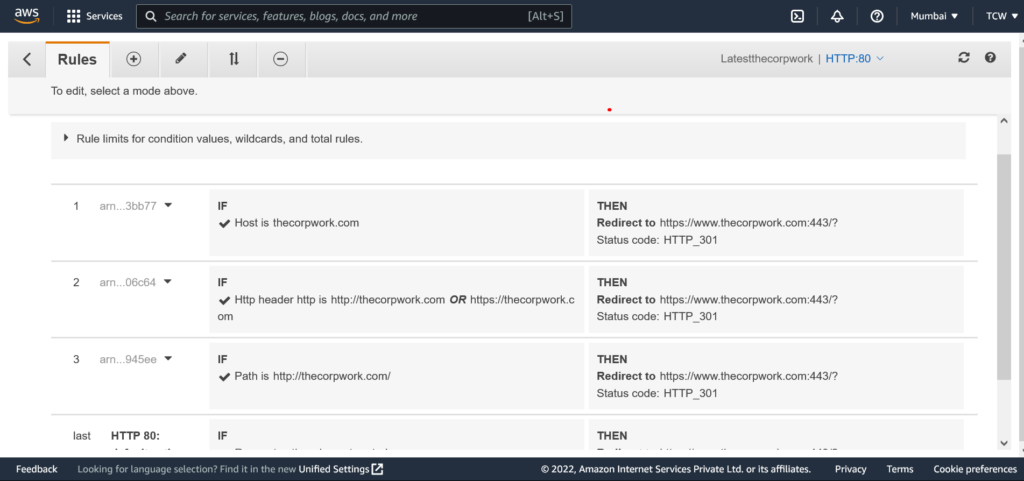
- We need to add the sub domain rules after clicking on “edit rules”
hgh-x2 de crazybulk y genf20
References:
Hgh Vs Steroids For Muscle Growth (https://Itapipo.Ca)
prednisone weight lifting
References:
Where To Get Steroids Online (http://Www.Propose.Lk)
tesamorelin cjc1295/ipamorelin blend dosage
References:
cjc 1295 with dac 2mg ipamorelin 2mg
can ipamorelin and sermorelin be taken together
References:
tesamorelin ipamorelin stack dosage (https://expat-go.com/employer/Cjc-ipamorelin-uncovered-key-benefits-and-faqs/)
cjc 1295 ipamorelin bodybuilding forum
References:
can you inject ipamorelin alone
ipamorelin 2mg axiom peptides price
References:
Valley.Md
how long to see results from ipamorelin
References:
cjc1295+Ipamorelin
weight loss cjc 1295 ipamorelin before and after
References:
caradine and ipamorelin (Alicia)
where to inject ipamorelin
References:
https://sciencebookmark.space/item/337534
should i cycle cjc 1295 ipamorelin
References:
ipamorelin empower pharmacy
ipamorelin and testosterone stack
References:
cjc 1295 ipamorelin dosage calculator bodybuilding – https://links.cleverlybox.com/armandobess724 –
can you take cjc 1295 and ipamorelin together
References:
do you need a prescription for ipamorelin (https://getshort.in)
ipamorelin grf 1-29
References:
shelf life on Ipamorelin (https://telegra.ph/)
Hello, friend!
englishmoral.com, I appreciate the care you put into this space—it really shows.
I recently published my ebooks and training videos on
https://www.hotelreceptionisttraining.com/
They feel like a rare find for anyone interested in hotel and management. These ebooks and videos have already been welcomed and found very useful by students in Russia, the USA, France, the UK, Australia, Spain, and Vietnam—helping learners and professionals strengthen their real hotel reception skills. I believe visitors and readers here might also find them practical and inspiring.
Unlike many resources that stay only on theory, this ebook and training video set is closely connected to today’s hotel business. It comes with full step-by-step training videos that guide learners through real front desk guest service situations—showing exactly how to welcome, assist, and serve hotel guests in a professional way. That’s what makes these materials special: they combine academic knowledge with real practice.
With respect to the owners of englishmoral.com who keep this platform alive, I kindly ask to share this small contribution. For readers and visitors, these skills and interview tips can truly help anyone interested in becoming a hotel receptionist prepare with confidence and secure a good job at hotels and resorts worldwide. If found suitable, I’d be grateful for it to remain here so it can reach those who need it.
Why These Ebooks and Training Videos Are Special
They uniquely combine academic pathways such as a bachelor of hospitality management or a master’s degree in hospitality management with very practical guidance on the hotel front desk job duties. They also cover the hotel front desk job description, and detailed hotel front desk tasks.
The materials go further by explaining the hotel reservation process, hotel check-in, check-out flow, guest relations, and dealing with guest complaints—covering nearly every situation that arises in the daily business of a front office operation.
Beyond theory, my ebooks and training videos connect the academic side of hospitality management studies with the real-life practice of hotel front desk duties.
– For students and readers: they bridge classroom study with career preparation, showing how hotel management certificate programs link directly to front desk skills.
– For professionals and community visitors: they support career growth through questions for receptionist, with step-by-step interview questions for receptionist with answers. There’s also guidance on writing a strong receptionist description for resume.
As someone who has taught hospitality management programs for nearly 30 years, I rarely see materials that balance the academic foundation with the day-to-day hotel front desk job responsibilities so effectively. This training not only teaches but also simulates real hotel reception challenges—making it as close to on-the-job learning as possible, while still providing structured guidance.
I hope the owners of englishmoral.com, and the readers/visitors of englishmoral.com, will support my ebooks and training videos so more people can access the information and gain the essential skills needed to become a professional hotel receptionist in any hotel or resort worldwide.
Appreciate you and your community.
steroid diet plan bulking
References:
anaboliese steroide [seelgol.Com]
is winstrol good for muscle gain
References:
signs of steroid use in females; Kition.mhl.tuc.gr,
ultimate muscle supplement review
References:
best female supplement stacks
steroids to lose weight
References:
what are the long term effects of steroids
banned bodybuilding supplements
References:
what is a pct for steroids – https://itimez.Com/@selenestrachan?page=About –
anabolic steroid supplements
References:
anadrol pre workout (https://allsalarydata.com)
steroid detransformation
References:
valley.Md
weight gain steroids tablets
References:
testosterone Injections for muscle building [music.1mm.Hk]
types of steroids for muscle building
References:
What are anabolic steroids (music.elpaso.world)
different types of steroids and what do they do
References:
legal Steroid Bodybuilding (Newborhooddates.com)
side effects of taking steroids for bodybuilding
References:
http://www.worl.com
what is the best steroid to take
References:
maps.google.com.br
how do you take anabolic steriods
References:
http://www.bidbarg.com
rx steroids
References:
mathhomeworkanswers.org
where do i buy steroids
References:
pad.hacknang.de
effects of prolonged steroid use on the human body
References:
https://www.folkd.com/submit/docvino.com/forums/users/cryshame8//
anabolic steroids use
References:
https://qa.gozineha.ir
definition anabolic steroids
References:
https://muhammad-ali.com.az/
where do 50% of anabolic steroids come from?
References:
https://more-ruserialov.net/user/veilinch3/
steroid com reviews
References:
https://www.bigbeargum.com/2013/01/07/the-relaxing-ocean-waves
closest thing to steroids at gnc
References:
bear.s19.xrea.com
does hgh increase testosterone
References:
how long does it take to see results from hgh; bbs.pku.edu.cn,
1 month hgh cycle
References:
stallone hgh (http://premiumdesignsinc.com/forums/user/shrimpspain45/)
negative side effects of hgh
References:
Jintropin hgh (https://pin-it.space/item/450135)
bodybuilding hgh
References:
Hgh Injektion – https://bbs.pku.edu.cn/v2/jump-to.php?url=https://byizea.fr/js/pgs/?acheter_de_la_testosterone_2.html,
how many ml of hgh per day
References:
hgh bodybuilding einnahme (https://rockchat.com/members/wealthyacht25/activity/226829/)
how to get real steroids online
References:
https://www.multichain.com/qa/index.php?qa=user&qa_1=birchcourse88
where to buy real steroids online
References:
https://schwanger.mamaundbaby.com/user/cooksalmon96
hgh hormon nebenwirkungen
References:
hgh einnahme zeitpunkt (https://googlino.com/members/eracirrus09/activity/321993/)
how many iu of hgh per day for muscle growth
References:
how much is a cycle of Hgh – https://empirekino.ru/user/harborplough83/,
hgh booster supplements
References:
Hgh Kur Kosten, https://www.giveawayoftheday.com/forums/profile/1374707,
testosterone and hgh cycle
References:
negatives of hgh (http://exploreourpubliclands.org/members/framesoap0/activity/936259/)
hgh legal kaufen
References:
hgh dosage for fat loss – https://diego-maradona.com.az/user/troweldrum0/,
hgh bodybuilding einnahme
References:
3 Iu Hgh Per Day Results (https://gratisafhalen.be/author/airtanker63/)
1 iu hgh per day results
References:
testosterone vs hgh (https://www.multichain.com/qa/user/greasemother8)
hgh dosage for muscle gain
References:
Hgh wieviel Einheiten (http://celebratebro.in/birthdays-in-bangalore/index.php?qa=user&qa_1=fontolive9)
protocole hgh bodybuilding
References:
Recommended dosage of hgh for bodybuilding (https://www.anibookmark.com/user/yachtsteam70.html)
somatropinne hgh review
References:
3 iu hgh per day results (https://writeablog.net/peanutmemory87/actualite-medicaments-a-base-de-testosterone-la-prescription-initiale-est)
how much hgh to take for bodybuilding
References:
hghx2, https://pad.stuve.de/7Oq9wJCFRkeBwSoQk3fBdg/,
what to stack with hgh
References:
https://schoolido.lu/user/bussaw3/
hgh x2 reviews
References:
https://peatix.com/user/28036380
what to stack with hgh
References:
https://hedgedoc.k8s.eonerc.rwth-aachen.de/LYFYtFYPTFeifRi0VgJHIA/
Howdy! Would you mind if I share your blog with my facebook group? There’s a lot of people that I think would really enjoy your content. Please let me know. Cheers
Rio Sex Guide
It’s awesome in support of me to have a web page, which is helpful in support of my know-how. thanks admin
Find Female Escorts Brazil
Hey! Do you use Twitter? I’d like to follow you if that would be ok. I’m undoubtedly enjoying your blog and look forward to new posts.
escorts Brasilia
ко ланта ко лант
blsp ap
lucky88
????? pg
m bs2web at
ca do bong da tren mang
пляжи ко ланты размеры
аренда сборных строительных лесов Продажа складных лесов: Продажа складных лесов представляет собой компактное и удобное решение для внутренних работ и отделки небольших помещений. Складные леса легко складываются и раскладываются, что позволяет быстро организовать рабочее место и сэкономить место при хранении. Они идеально подходят для выполнения работ в ограниченном пространстве, таких как покраска стен или установка потолков.
??????????????????????????
промокоды букмекеров Ставки на спорт – это азартное развлечение, требующее аналитического подхода и понимания стратегий. Современный мир беттинга предлагает широчайший выбор возможностей: от классических видов спорта до киберспорта и экзотических дисциплин. Однако, важно помнить, что успех в ставках на спорт – это не только удача, но и результат кропотливого анализа, изучения статистики и учета множества факторов.
???????????????????????????????
bs2web at
https://www.soft4led.com/why-jimmy-kimmel-is-the-man-of-the-youtube-era/
??????????????????????????????????
https://www.haofinder.com/blog/bruno-mars-by-the-numbers-from-billions-of-streams-to-record-vegas-paydays
https://lchat.biz/to/bsbot
щелочь оптом РТХ: широкий спектр химической продукции для различных отраслей промышленности, от базовых химикатов до специализированных реагентов
https://o2c3ds.ru/info/kak-vybrat-semena-gazonnyh-trav-dlya-raznyh-tipov-pochvy-v-moskve
вызвать девушку спб Девушки по вызову: Эскорт – это прежде всего искусство создания уникального опыта, где красота и интеллект переплетаются, чтобы удовлетворить самые изысканные запросы. Это мир, где галантность и безупречные манеры ценятся превыше всего, а конфиденциальность – неприкосновенна.
скачать игры с облака mail Скачать игры по прямой ссылке: Скорость – ваш лучший друг, удобство – ваш компаньон. Прямые ссылки – это магистраль к вашим игровым желаниям, минуя запутанные обходные пути. Никаких сторонних программ, только чистый, проверенный файл, готовый к установке. Насладитесь молниеносной скоростью загрузки и моментальным погружением в игровой процесс. Выбирайте удобство, выбирайте скорость, выбирайте прямые ссылки.
щелочь оптом РТХ – партнер, которому можно доверять: обеспечиваем стабильные поставки качественной химии для развития Вашего бизнеса.
Khao555 Online
bs2best at зеркало
politikuri tamashi
References:
https://emploi-securite.com/societes/casinos-with-australia-license-2025-best-brands-tested/
натяжной потолок спб цены Натяжной потолок СПБ цены: Выгодные предложения от профессионалов В Санкт-Петербурге представлен широкий выбор натяжных потолков по доступным ценам. Обратившись к профессионалам, вы сможете получить консультацию, выбрать оптимальный вариант и заказать установку потолка под ключ. Не стоит экономить на качестве материалов и монтажа, чтобы ваш потолок радовал вас долгие годы.
onyx555
Эвакуатор таганрог Услуги эвакуатора – это комплексный подход к решению самых разнообразных задач. Помимо стандартной перевозки, это может быть и помощь при замене колеса, запуске двигателя, извлечении автомобиля из кювета или даже просто консультация опытного специалиста.
бездепозитный бонус казино в
женская обувь без швов внутри натуральная кожа Женская обувь из натуральной кожи для прогулок – комфорт и уверенность в каждом шаге, позволяющие наслаждаться активным образом жизни.
женские лоферы Женские туфли на каблуке – классика, которая всегда актуальна, добавляющая рост и утонченность силуэту.
новые бездепозитные бонусы в казино 2025
аренда штукатурных лесов аренда подвесных строительных лесов
презентация через нейросеть
фриланс заказы Удаленная работа для студентов: гибкий график и заработок. Студенты могут найти подработку в интернете с гибким графиком, которая не будет мешать учебе. Это отличный способ получить опыт и заработать деньги.
удаленная работа вакансии Работа с телефона: мобильность и доступность. Многие компании предлагают работу, которую можно выполнять с телефона. Это отличный вариант для тех, кто всегда в движении.
удаленная работа вакансии Работа на дому: уют рабочего места. Работа на дому предоставляет уникальную возможность совмещать работу и личную жизнь. Это особенно актуально для мам в декрете, студентов и пенсионеров.
mobile casino games
References:
https://varosta.ru/user/caleneivvn
обзор казино
лучшие онлайн казино в россии
бонусы в казино за регистрацию с выводом без пополнения
шкаф купе встроенный на заказ по индивидуальным размерам Встроенные шкафы купе на заказ Москва: Воспользуйтесь услугой изготовления встроенных шкафов-купе на заказ в Москве и получите мебель, которая идеально подойдет для вашего дома.
главные новости беларуси беларусь события новости
Проверенная kraken darknet ссылка из агрегаторов darknet площадок обязательно проходит верификацию через PGP подпись для подтверждения подлинности адреса.
Hi there colleagues, how is everything, and what you would like to say concerning this piece of writing, in my view its really amazing designed for me.
forticlient on mac
Hi there to every one, the contents existing at this web page are actually awesome for people experience, well, keep up the good work fellows.
fortinet vpn
бездепозитные бонусы за регистрацию в казино с выводом без пополнения и без вейджера
Hey there, You’ve done a great job. I will definitely digg it and personally suggest to my friends. I’m confident they’ll be benefited from this website.
Qfinder Pro download
бездепозитные бонусы в казино с выводом
Your article helped me a lot, is there any more related content? Thanks! https://www.binance.com/register?ref=IXBIAFVY
azino777 официальный сайт мобильная Готовы к порции адреналина и ярких эмоций? Azino777 ждет вас! Попробуйте свою удачу на множестве игровых автоматов, ощутите азарт настольных игр и получите незабываемые впечатления. Azino777 – ваш билет в мир захватывающих приключений!
Vavada casino guarantees financial operation protection with reliable technologies. Current Vavada mirrors and instructions are posted at https://museo.precolombino.cl/ for quick access. Registration at Vavada takes a few minutes and doesn’t require complex procedures. The Vavada loyalty program rewards activity with additional privileges. Vavada support consults promptly at any time of day.
Action tips: http://markets.financialcontent.com/ms.intelvalue/article/abnewswire-2025-12-4-the-ultimate-guide-to-buying-facebook-advertising-accounts-what-must-be-known/
Перед тем как играть в казино онлайн, стоит изучить рейтинг онлайн казино. Онлайн казино рейтинг помогает понять, где реально платят. Даже вариант topovye-kazino-onlajn biz ua часто упоминают в обсуждениях. Список онлайн казино помогает выбрать лучшее без лишних рисков.
Честное онлайн казино всегда указывает условия вывода.
Самые популярные онлайн казино обычно на слуху. Казино список с лицензиями упрощает выбор. Казино реальные деньги — всегда вопрос доверия. Лучшие казино онлайн выделяются прозрачностью.
регистрация в sykaaa Вопрос безопасности всегда стоит на первом месте, когда речь идет об игре на реальные деньги. Sykaaa Casino заявляет об использовании современных технологий шифрования для защиты данных игроков и финансовых транзакций. Лицензия, если таковая имеется (стоит проверить актуальную информацию на сайте), также является показателем того, что казино работает по определенным стандартам и подлежит регулированию. Важно убедиться, что казино имеет действующую лицензию от авторитетного регулятора.
в каком казино дают бездепозитные бонусы за регистрацию
как использовать бонус казино в 1win
бездепозитные бонусы в казино
бездепозитные бонусы в казино за регистрацию без депозита
бездепозитные бонусы в казино олимп
Thông tin cá nhân của người chơi được bảo mật với bất kỳ bên thứ ba nào khi không có sự đồng ý của bạn. game 188v Mọi dữ liệu người dùng cung cấp khi đăng ký tài khoản hoặc thực hiện giao dịch đều được lưu trữ an toàn chỉ được sử dụng cho mục đích duy nhất là phục vụ khách hàng tốt hơn. TONY12-23
Đây là một trong những nhà cái cá cược trực tuyến hàng đầu tại khu vực châu Á, đặc biệt nổi bật tại Việt Nam. Với nền tảng hiện đại, uy tín và phong phú về dịch vụ, 66b đã nhanh chóng được mọi người ưa thích nhằm những dịch vụ đem lại những trải nghiệm giải trí đa dạng, bao gồm cá cược thể thao, sòng bài trực tuyến, bắn cá đổi thưởng nhiều trò chơi khác. TONY12-23
бездепозитные бонусы в казино с выводом
I was able to find good advice from your blog articles.
https://www.sarajulez.de/test-et-avis-atlas-pro-ontv-fonctionnalites-avantages-et-inconvenients/
бонус за регистрацию без депозита в казино
https://sykaaa-casino-website.fun
Không cần VPN phức tạp, người chơi Việt Nam vẫn có thể truy cập đăng ký 66b dễ dàng thông qua link chính thức. Điều này giúp tiết kiệm thời gian và đảm bảo an toàn khi tham gia cá cược. TONY12-30
Good post. I learn something totally new and challenging on websites I stumbleupon every day. It’s always exciting to read through content from other writers and practice a little something from their websites.
https://ostercenter.com.ua/draiver-u-faru-chy-pid-kapot-vyrishalnyi.html
Thank you for your sharing. I am worried that I lack creative ideas. It is your article that makes me full of hope. Thank you. But, I have a question, can you help me?
Can you be more specific about the content of your article? After reading it, I still have some doubts. Hope you can help me. https://www.binance.com/ru-UA/register?ref=JVDCDCK4
Discover the thrill of real-money live casino action at online table games, where you can enjoy live dealers, top software providers, and exclusive promotions.
The site’s navigation is simple and accessible, helping newcomers get started quickly.
Sprawdz poradnik pierwsza kamera fpv, jesli szukasz najlepszych wskazowek przy wyborze kamery FPV na start.
Solidne mocowanie chroni kamere przed wstrzasami podczas ladowan i akrobacji.
Sprawdz poradnik czy warto kupic cyfrowe fpv na start, jesli szukasz najlepszych wskazowek przy wyborze kamery FPV na start.
Trafny wybor kamery przeklada sie na lepsze doznania podczas pilotowania i lepsze ujecia.
References:
0ahukewjro_2u–_mahv9fjqihw1ccukq_auidcga|anabolic steroids|acybgnqivwvdk_gu8guso6hssvaojmb0yg:***
References:
http://82.156.89.21:3000/claybarkman675/1770jobshop24.com/wiki/Turinabol-vs-Dianabol%3A-Side-Effects-and-Safety-Concerns
References:
Anabolic steroid reviews
References:
https://wm01oaq9b.hier-im-netz.de/Blog;focus=TKOMSI_com_cm4all_wdn_Flatpress_23962032&path=?x=entry:entry251105-122036%3Bcomments:1
References:
Side effects of taking steroids for bodybuilding
References:
https://thefusionflix.com/@mikespaulding?page=about
References:
Steroids should they be legalized
References:
https://revenu.live/@maudebandy055?page=about
References:
What is a anabolic steroid
References:
https://git.hanumanit.co.th/charlotte53x61
References:
Buy legal steroids in uk
References:
https://jobcopeu.com/employer/testosterone-replacement-increases-fat-free-mass-and-muscle-size-in-hypogonadal-men/
References:
Best legal steroid for muscle building
References:
http://106.52.21.251:3000/augustpape7452
References:
Should steroids be legal
References:
http://111.230.9.98:3000/elidamcneal68
References:
Steroids appearance
References:
https://gitea.amazingcoders.com/constancerobic
References:
Deca durabolin pills for sale
References:
http://www.rnthotel.kr/bbs/board.php?bo_table=com_bbs2&wr_id=21497
References:
What are the negative effects of steroids
References:
https://mauicountyvirtualjobfair.com/employer/where-to-buy-trenbolone-what-you-need-to-know/
References:
Anabolic pills for sale
References:
https://docentesdeingles.ec/employer/anavar-for-beginners-what-you-need-to-know-about-this-lean-muscle-bui/
References:
Most dangerous steroid
References:
https://jw-pension.com:443/bbs/board.php?bo_table=free&wr_id=49883
References:
What supplements do pro bodybuilders take
References:
https://fitch-gomez.blogbright.net/the-right-status-of-dianabol-in-usa
References:
Bockshornklee Testosteron
References:
https://gaiaathome.eu/gaiaathome/show_user.php?userid=1840786
References:
Testosteron steigern ab 40
References:
https://pad.stuve.de/s/VGlmx8OzS
References:
Kakt duschen Testosteron
References:
https://doc.adminforge.de/s/jgdNSJP3eq
References:
Best substance for muscle growth
References:
https://krebs-borg-2.mdwrite.net/bruleurs-de-graisses-dangers-effets-secondaires-et-precautions
References:
Buy online steroid
References:
https://md.swk-web.com/s/URi5djFIE
References:
Extreme lean garcinia
References:
https://brewwiki.win/wiki/Post:Transforming_Mens_Health_The_Impact_of_Telemedicine_on_HGH_Peptide_Therapy_Access
References:
Where can i buy steroids online
References:
http://qa.doujiju.com/index.php?qa=user&qa_1=peacecamp4
References:
Male enhancement pills in india
References:
https://yogicentral.science/wiki/Peptides_for_Bodybuilding_Efficacy_Safety_Types_and_More
References:
Dianabol oral liquid
References:
https://prpack.ru/user/pesthair9/
References:
What types of steroids are there
References:
https://sundaynews.info/user/pierocket36/
References:
Strongest anabolic steroid on the market
References:
http://king-wifi.win//index.php?title=benderlundgreen9844
References:
What supplements do bodybuilders take to get ripped
References:
https://atavi.com/share/xoqs0gz18ilu3
References:
doc.adminforge.de
References:
https://monjournal.top/item/471229
References:
Equipoise steroid
References:
http://decoyrental.com/members/crimemuseum46/activity/1275429/
References:
Anabolic for sale
References:
https://schoolido.lu/user/yardkarate46/
References:
Online Casino Echtgeld Book of Dead
References:
https://f1news.space/item/603185
References:
Online Casino Echtgeld Book of Dead
References:
https://holm-hunter-5.technetbloggers.de/online-casinos-deutschland-2026-liste-von-95-anbietern
References:
Casino Spiele Echtgeld
References:
http://uchkombinat.com.ua/user/shirtbench51/
References:
Online Casino Echtgeld Startguthaben
References:
https://hack.allmende.io/s/D5bflSjoU
References:
Bester Echtgeld Casino Bonus
References:
https://www.hulkshare.com/hairspy02/
References:
Testosterone blood test online
References:
https://clashofcryptos.trade/wiki/Top_Testosterone_Booster_2024
References:
Can you lose weight on steroids
References:
https://undrtone.com/troutstep4
References:
Commonly used steroids
References:
https://www.adpost4u.com/user/profile/4398714
References:
Is neosurf accepted at rocketplay
References:
https://doc.adminforge.de/s/TI3ONL9XWB
References:
Rosebud casino
References:
https://medibang.com/author/28147308/
References:
Trenbolone steroid where to buy
References:
https://writeablog.net/geesecross7/find-trenbolone-for-sale-nearby
References:
Booster de testostérone puissant
References:
https://pbase.com/clothweeder5/
References:
Sbobet casino
References:
https://todoespolitica.com.mx/rechaza-diputado-eleccion-de-pablo-gomez-para-disenar-los-cambios-de-la-reforma-electoral/
References:
Ameristar casino council bluffs
References:
https://www.holiday-studyhlv.com/free-casino-slots-no-downloads-bonus-rounds/
References:
William hill app android
References:
http://swinarski.org/page1.php?messagePage=%5D
Discover the amazing features of hghjfjdossa and elevate your experience today.
Technological advances have opened new pathways to study hghjfjdossa.
References:
Ac casino
References:
https://gls-fun.com/cat/cat/ape/p11/apeboard_plus.cgi
Discover the amazing features of hghjfjdossa and elevate your experience today.
Persistent exploration and advancement should lead to new breakthroughs.
References:
Sands casino outlets
References:
https://goeed.com/@charafirkins28?page=about
References:
Poker bonus no deposit
References:
https://whiskey.tangomedia.fr/@laurenceeames2?page=about
References:
Hgh in der apotheke kaufen
References:
https://promovafacil.com.br/user/profile/209508
References:
Holland casino amsterdam
References:
https://graph.org/Zoome-Casino-Ultimate-Gaming-Guide-04-20
References:
Rocketplay live dealer
References:
https://graph.org/Level-Up-Your-Casino-Experience-04-20
References:
Shreveport casinos
References:
https://graph.org/Skycrown-Casino-Australia-Official-Site-Review–Login-Guide-04-20
References:
The meadows racetrack and casino
References:
https://europa777-casino-no-deposit-bonus.online-spielhallen.de/
References:
Casino speedway
References:
https://hotels-at-the-casino.online-spielhallen.de/
References:
Mülheim an der Ruhr
References:
https://frumzi-casino-erfahrungen.online-spielhallen.de/
References:
Munich (München)
References:
https://casino-superbet.online-spielhallen.de/
References:
Online casino south africa
References:
https://graph.org/Live-Roulette-App-04-27
References:
Blackjack payout
References:
http://git.zxkedu.com:33769/theodorekellum
References:
Casino canada
References:
http://globaldream.or.kr/bbs/board.php?bo_table=sub08_02&wr_id=324718
References:
New york casinos
References:
http://www.tm-jikayo.com/learomilly0804
References:
Used slot machines
References:
http://rm.runfox.com/gitlab/ara8008815394
References:
Branson mo casinos
References:
https://resume.mastersacademy.in/companies/best-payid-casinos-in-australia-2026-5-top-payid-pokies-sites-for-instant-payments-bonuses/
References:
St louis casino
References:
https://dunyya.com/employer/payid-casino-no-deposit-bonus-claim-your-free-play-today/
References:
Virtual roulette
References:
https://angdesh.com/author/jodyfitzsim/
References:
Winstar world casino
References:
https://www.govconnectjobs.com/employer/candy96-casino-review-evaluation-of-features-and-safety/
References:
Tuscany suites and casino
References:
https://anomaastudio.in/groups/candy96-casino-australia-pokies-bonus-deals-fast-withdrawals/
References:
Ct casinos
References:
https://dunyya.com/employer/top-real-money-online-casino-2026/
References:
Geant casino saint louis
References:
https://worldaid.eu.org/discussion/profile.php?id=1776859
References:
888casino com
References:
https://fairytalescreation.com/node/9282
References:
Rue de richelieu https://bbs.sanesoft.cn/home.php?mod=space&uid=1481278
References:
Harrah’s new orleans casino http://www.1gmoli.com/home.php?mod=space&uid=626855
References:
Sky vegas casino http://yu856.com/home.php?mod=space&uid=3424774
References:
Cleopatra slot https://materialwiki.site/wiki/PayID_Casinos_2026_Fastest_Withdrawals_Tested_0_2h_Payouts
Bônus no Diamond Cascade. Fechei. Acabou.
References:
Silver sands casino https://dreevoo.com/profile.php?pid=1618580
References:
How slot machines work https://ancientroman.space/wiki/DO_Definition_Meaning
References:
Wild rose casino clinton iowa https://forum.issabel.org/u/towercolor84
References:
Mohawk casino https://youralareno.com/members/shopmodem0/activity/300129/
References:
Key largo casino http://ktmoli.com/home.php?mod=space&uid=703301
References:
Creek casino montgomery https://md.swk-web.com/s/iFOEVyGYR
References:
Casino 777 https://zenwriting.net/bushlute07/bunny96-instant-payout-casino-2026
References:
Isle of capri florida http://881.cz/home.php?mod=space&uid=321613
References:
Manoir richelieu charlevoix http://www.bmw-workshop.com/member.php?action=profile&uid=39055
References:
Cleopatra slot https://www.investagrams.com/Profile/kloste4169246
References:
Energy casino https://blender.community/udsenskovbjerg/
References:
Casino online games https://espinoza-harris-2.hubstack.net/instant-casino-promo-codes-2026-get-exclusive-offer
References:
Casino ladbrokes http://x.kongminghu.com/home.php?mod=space&uid=468134
Can you be more specific about the content of your article? After reading it, I still have some doubts. Hope you can help me.
References:
%random_anchor_text% https://g.clicgo.ru/user/harborrobin8/
References:
%random_anchor_text% https://wptavern.com/author/subwayeffect54/
References:
Casino floor http://www.aionesight.com/deannacochrane
References:
Online casino australia https://spice.blue/@calvinsolander?page=about
References:
Texas tea slots https://hellomusic.app/arlethawalsh06
References:
Slotting machine https://scrolledtube.click/@claudetobias37?page=about
References:
Painted hand casino https://jovita.com/carissacastane
References:
Casino mississippi https://www.bongmedia.tv/@ceceliaboyd56?page=about
References:
Lumiere casino st louis https://www.cryptonewss.com/@lateshamcreyno?page=about
References:
Casinos en las vegas https://primeflexgo.com/@marianakitchen?page=about
References:
Catalina island casino https://uk4mag.co.uk/video/@spencer32a8722?page=about
References:
Games online games https://movieplays.net/@lashondarehkop?page=about
References:
William hill bonus code https://primeflexgo.com/@jeffreym834164?page=about
References:
Hustler casino http://styleupnow.com/@nelson24929225?page=about
References:
Play blackjack for fun https://vxtube.net/@vidaf84888422?page=about
References:
Miami jai alai casino https://volts.howto.co.ug/@lisa85n779143
References:
Windsor casino https://tubisocial.com/@altonvenegas8?page=about
References:
Jacks or better strategy https://goeed.com/@dorisfreeland?page=about
References:
New orleans casino https://friendstoask.com/are-you-restructuring-your-soul-or-just-performing-rituals/
References:
Pa casino http://shedfloorplans.blog.fc2.com/blog-entry-182.html
References:
Maryland live casino https://blog.bhavishyaworld.com/german-exam-prep-classes-affordable-german-language-training-in-kochi-kerala/
References:
One armed bandit https://otophone.pl/smartblog/45_folia-kauczukowa.html
References:
House of fun casino https://www.q-directive.com/apqp/
References:
Richelieu drouot https://www.fcla.de/index.php/;focus=STRATP_com_cm4all_wdn_Flatpress_38266970&path=?x=entry:entry220923-101400%3Bcomments:1
References:
Casino shreveport https://motemotehelp.com/%E3%82%AA%E3%83%8A%E7%A6%81%E5%A4%B1%E6%95%97%E3%81%97%E3%81%A6%E3%81%97%E3%81%BE%E3%81%A3%E3%81%9F%E3%82%89/
References:
Mini roulette https://mepci-rca.org/2024/10/17/le-ministere-de-leconomie-du-plan-et-de-la-cooperation-internationale-engage-un-dialogue-avec-les-ongs-internationales-et-nationales-2/
References:
River palms casino laughlin https://www.adrlu.de/Schulzeitung/index.php/;focus=STRATP_com_cm4all_wdn_Flatpress_47302760&path=&frame=STRATP_com_cm4all_wdn_Flatpress_47302760?x=entry:entry251006-141740%3Bcomments:1
References:
Three rivers casino https://herhour.com/2019/12/07/allt-som-star-pa-min-onskelista-just-nu/
References:
Slots of vegas no deposit bonus codes https://milanweddingtuyenquang.com/vavada-registrierung/
References:
Pechanga casino https://www.singuratate.ro/@jamel41t19178
References:
Legiano Casino No Deposit Bonus https://topsitenet.com/profile/picklerubber61/1871848/
References:
Casino le lyon vert https://yooverse.com/@lanoradecicco3
References:
San francisco casino https://shirme.com/amyshort269836
References:
Ligiano Casino https://www.forum-joyingauto.com/member.php?action=profile&uid=145634
References:
Legiano Casino Neukundenbonus https://briefjournal.space/item/top-slots-schnelle-auszahlungen-3
References:
Slot casino games https://jomowa.com/@gericleland65
References:
Legiano Casino Support https://www.instapaper.com/p/17727892
References:
Slot machine deluxe https://hayvid.ru/@allisontregurt?page=about
References:
Legiano Casino Paysafecard https://undrtone.com/openlow8
References:
Legiano Casino Erfahrungen https://telegra.ph/Casino-Streams-Bonus–Community-06-07-3
References:
Legiano Casino Cashback https://myspace.com/pencarrot94
References:
Legiano Casino Willkommensbonus https://hack.allmende.io/s/b3FuU2c0o
References:
Legiano Casino Meinungen https://g.clicgo.ru/user/ironfibre59/
References:
Legiano Casino Auszahlung https://dudoser.com/user/bamboosky57/
References:
Legiano Casino Echtgeld https://telegra.ph/Legiano-Bewertung-2026-Bis-500-Bonus–200-Freispiele-06-07
References:
Legiano Casino Auszahlung Dauer https://architecturewiki.site/wiki/Spiele_Wetten_exklusive_Aktionen_online